

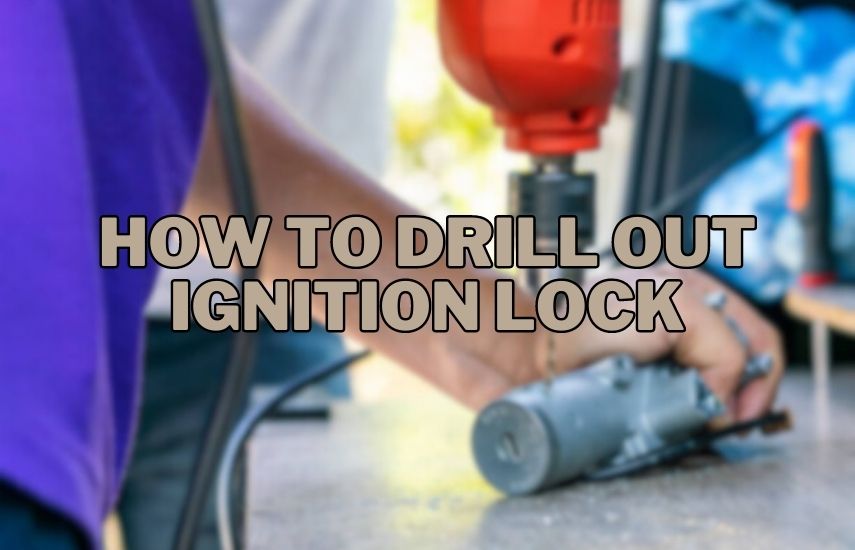
The ignition lock is an essential component of a vehicle’s security system, designed to prevent unauthorized access and ensure that only the rightful owner can start the car. However, there may be instances where the ignition lock becomes damaged or jammed, making it necessary to remove or replace it. One method used to extract a faulty ignition lock is drilling.
How To Drill Out Ignition Lock? Drilling out an ignition lock involves using a power drill with gradually increasing drill bit sizes to create a hole in the lock cylinder. This allows for the removal of the cylinder, which can then be replaced with a new one.
In this blog post, we will provide a step by step complete guide on how to drill out an ignition lock, emphasizing safety precautions
Disclaimer
Before we begin, it’s important to note that drilling out an ignition lock should only be done if you have the necessary skills and experience. We strongly recommend consulting a professional locksmith or a trained automotive technician to avoid causing further damage to your vehicle.
Gather The Necessary Tools
When embarking on the task of drilling out an ignition lock, it’s essential to gather the necessary tools to ensure a successful and safe procedure. Here’s a more detailed description of each tool:
Cordless Drill With A Variety Of Drill Bit
A cordless drill provides convenience and portability during the drilling process. It allows you to move freely without the restrictions of a power cord. Make sure the drill is fully charged or has spare batteries available. Having a variety of drill bits is important as it allows you to start with a smaller bit for creating a pilot hole and progressively increase the size to enlarge the hole as needed. It’s recommended to use drill bits made of titanium or cobalt, as they tend to be more durable and suitable for drilling through metal.
Screwdriver Set
A set of screwdrivers will be handy for removing any screws or covers that may be securing the ignition lock in place. Different sizes and types of screwdrivers may be required depending on the specific vehicle model and the components holding the lock cylinder. It’s advisable to have a comprehensive screwdriver set that includes both flathead and Phillips screwdrivers to accommodate various types of screws.
Hammer
A hammer can be useful for tapping or lightly striking the screwdriver when attempting to loosen or remove the lock cylinder. The hammer’s purpose is to provide controlled force to aid in dislodging or breaking loose any stubborn parts. Use the hammer with caution, applying only enough force to assist in the removal process without causing damage to surrounding components.
Pliers
Pliers are versatile tools that can assist in gripping and twisting the lock cylinder as you drill. They can be particularly helpful if the cylinder is tightly secured or resistant to removal. Choose a pair of pliers that offer a good grip and have enough strength to exert pressure without slipping.
Safety Goggles
Protecting your eyes is of utmost importance during any drilling or mechanical work. Safety goggles shield your eyes from flying debris, metal shavings, or accidental splashes of lubricants or solvents. Ensure that the safety goggles fit properly and provide adequate coverage around your eyes. Avoid using regular eyeglasses or sunglasses, as they may not offer the same level of protection as safety goggles.
Gloves
Wearing gloves is strongly recommended to safeguard your hands throughout the drilling and removal process. They offer protection against sharp edges and potential injury from metal fragments and provide better grip and dexterity when handling tools. Look for gloves that are comfortable, fit well, and maintain your ability to operate the tools effectively.
To prioritize safety when using these tools. Always follow safety guidelines, wear appropriate personal protective equipment, and exercise caution while handling power tools and sharp objects. If you’re unsure or lack experience, it’s advisable to look for assistance from a professional locksmith or an automotive expert.
Disconnect The Vehicle’s Battery
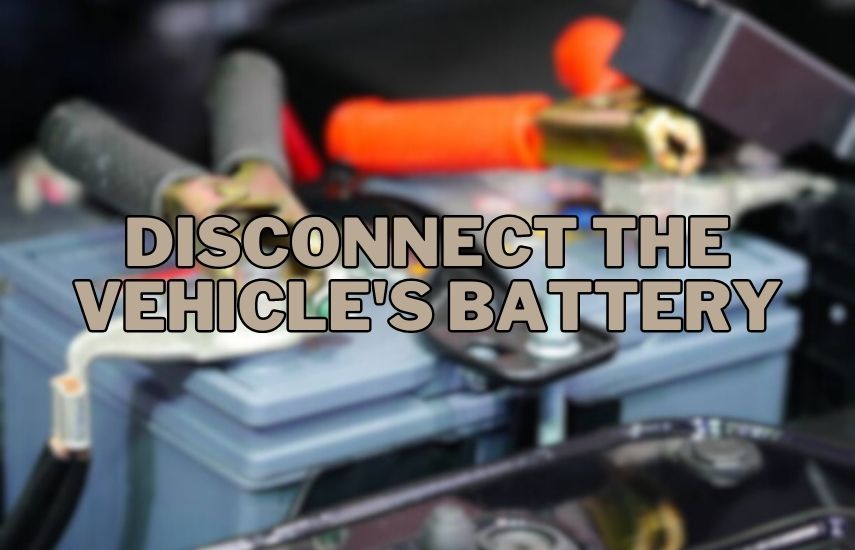
For safety reasons, it is important to disconnect the vehicle’s battery before starting any work on the ignition lock. Locate the battery in your vehicle and carefully remove the negative terminal connection.
Locate The Vehicle’s Battery
The battery is commonly located under the hood of the vehicle, although in some vehicles, it may be in the trunk or under a seat. Consult the vehicle’s owner’s manual to determine the exact location of the battery.
Prepare For Battery Disconnection
Before you start, ensure that the ignition is in the “off” position and remove the key from the ignition. This prevents any accidental electrical contact or starting of the vehicle during the procedure.
Identify The Battery Terminals
The battery terminals are metal posts located on top of the battery. There are two terminals: a positive terminal (marked with a “+” symbol) and a negative terminal (marked with a “-” symbol).
Disconnect The Negative Terminal
Begin by disconnecting the negative terminal as a safety precaution. Using an appropriate-sized wrench or socket, locate the nut or bolt securing the negative terminal connector. The negative terminal is commonly marked with a black or negative (-) sign. Place the wrench or socket on the nut or bolt and turn it counterclockwise to loosen it. Once loose, carefully remove the negative terminal connector from the battery post. It’s important to avoid any contact between the negative terminal and the battery post to prevent accidental electrical contact.
Insulate The Disconnected Negative Terminal
To ensure additional safety and prevent accidental reconnection or contact with the battery, it’s advisable to cover the disconnected negative terminal with a non-conductive material. Electrical tape or a battery terminal protector can be used for this purpose. Wrap the disconnected terminal with several layers of electrical tape or place a battery terminal protector over it.
Verify Battery Disconnection
After disconnecting the negative terminal, verify that the ignition is off and the vehicle’s electrical systems are not functioning. Attempt to start the vehicle or check if any lights or electronics are still operational. If everything is in the “off” position and no electrical activity is observed, it confirms that the battery has been successfully disconnected.
By disconnecting the vehicle’s battery, you ensure that no electrical power is supplied to the ignition system during the work, minimizing the risk of electrical shock or accidental activation of the ignition. Remember to handle the battery and terminals with care to avoid any accidental short circuits or damage. When working with the battery, avoid wearing any metal jewelry or accessories that could inadvertently make contact with the battery terminals.
Remove The Steering Column Cover
Removing the steering column cover is an important step when drilling out an ignition lock. Here’s a more detailed explanation of the process:
Prepare For Cover Removal
Before you begin, make sure the vehicle’s battery has been disconnected as per the earlier instructions. This will prevent any accidental electrical contact and enhance safety during the procedure.
Locate The Steering Column Cover
The steering column cover is a protective panel surrounding the steering column and various components, including the ignition lock cylinder. It is typically made of plastic or metal and is situated just behind the steering wheel.
Inspect The Cover And Fasteners
Take a close look at the steering column cover to identify the screws or bolts that hold it in place. The number and location of these fasteners may vary depending on the make and model of the vehicle. Commonly, you will find screws or bolts near the top and bottom of the cover or along its sides.
Select The Appropriate Screwdriver
Choose a screwdriver that matches the type and size of the screws or bolts on the steering column cover. The most common types are Phillips or flathead screwdrivers. Ensure that the screwdriver tip fits securely into the screw or bolt head to avoid slipping and potential damage.
Loosen And Remove The Fasteners
Using the selected screwdriver, carefully loosen and remove the screws or bolts that secure the steering column cover in place. Start with one fastener at a time, turning it counterclockwise to loosen it. Avoid applying excessive force, as it could strip the screw or bolt head. Repeat this process for all the fasteners holding the cover.
Pry Off The Cover
Once all the fasteners have been removed, the steering column cover should be free to be taken off. Gently insert a flathead screwdriver or a trim panel removal tool into the gap between the cover and the steering column. Apply gentle pressure to pry the cover away from the column. Work your way around the edges, prying the cover until it comes loose. Take care not to force or bend the cover excessively, as it may break.
Set Aside The Cover
Once the plstic cover is removed, set it to one side in a safe place to avoid any damage or misplacement. You may need to reinstall the cover later, especially if you’re replacing the ignition lock cylinder.
Access The Ignition Lock Assembly

Within the steering column, locate the ignition lock assembly. This may require removing additional components, such as the ignition switch or wiring harnesses. Refer to your vehicle’s service manual for specific instructions on accessing the ignition lock assembly.
Consult The Vehicle’s Service Manual
Each vehicle model may have specific instructions and variations on how to access the ignition lock assembly. It’s important to consult the vehicle’s service manual for accurate guidance tailored to your particular make and model. The manual will provide detailed instructions on disassembling the steering column and accessing the ignition lock assembly.
Position The Steering Wheel
Before you begin, ensure that the steering wheel is in a neutral position. Straighten the wheels by aligning them with the vehicle’s frame. This step helps to prevent any interference or binding when disassembling the steering column.
Disassemble Additional Components
Depending on your vehicle’s design, you may need to remove additional components to access the ignition lock assembly. Common components that might need to be removed include the ignition switch and wiring harnesses. Follow the instructions in the service manual to locate and remove these components safely.
Remove The Ignition Switch
The ignition switch is typically mounted near the steering column and may be secured with screws or bolts. Use the appropriate screwdriver or wrench to loosen and remove the mounting hardware. Once removed, disconnect any electrical connectors or wiring harnesses attached to the ignition switch.
Disconnect Wiring Harnesses
If there are any wiring harnesses or electrical connectors obstructing access to the ignition lock assembly, disconnect them carefully. Take note of their positions or mark them to ensure proper reconnection later.
Locate The Ignition Lock Assembly
Once additional components and wiring harnesses are removed, the ignition lock assembly should be visible within the steering column. It is mainly located near the ignition switch area. Take a moment to familiarize yourself with the assembly’s position and components before proceeding.
Follow Specific Instructions
The specific steps to access the ignition lock assembly will vary depending on the vehicle. The service manual will provide step-by-step instructions, including any specific tools or techniques required for disassembly.
Exercise Caution
Throughout the disassembly process, exercise caution to avoid damaging any components or wiring within the steering column. Take your time and pay attention to small details to ensure a smooth and successful access to the ignition lock assembly.
By following the vehicle’s service manual instructions, you can safely disassemble the necessary components, including the ignition switch and wiring harnesses, to access the ignition lock assembly within the steering column.
Identify The Shear Line
To successfully drill out the ignition lock, it is important to identify the shear line, which is the point where the ignition lock cylinder separates from the ignition switch. Here’s a more detailed explanation of this step:
Familiarize Yourself With The Lock Cylinder
The ignition lock cylinder is the segment of the ignition assembly that accepts the key and allows the vehicle to be started. Please take a moment to examine the lock cylinder and its components. It typically consists of a cylindrical body with a keyway, tumblers, and springs inside.
Understand The Shear Line Concept
The shear line refers to the separation point between the inner and outer cylinders of the lock assembly. When the correct key is inserted, the tumblers align along the shear line, allowing the cylinder to rotate and activate the ignition switch. During the drilling process, the objective is to create a separation at this shear line to remove the lock cylinder.
Locate The Ignition Switch
The ignition switch is the electrical component connected to the ignition lock cylinder. It is usually located near the steering column and is responsible for sending signals to various electrical systems in the vehicle. The ignition switch is separate from the lock cylinder, and the shear line is the point where they connect.
Identify The Shear Line
Examine the area where the lock cylinder and ignition switch meet. The shear line is typically a small gap or seam between the outer housing of the lock cylinder and the ignition switch. It may appear as a line or a slight indentation. The precise location and visibility of the shear line can vary depending on the specific vehicle’s design.
Take Note Of The Shear Line’s Position
Once you have located the shear line, please take note of its position relative to other components and markings on the ignition lock assembly. This will help you during the drilling process to ensure you target the correct area.
Prepare for drilling: Before you proceed with drilling, make sure you have gathered the necessary tools, as mentioned earlier, including a cordless drill with a variety of drill bits.
Identifying the shear line is a critical step in drilling out the ignition lock. By understanding the concept and locating the shear line correctly, you can focus your drilling efforts on separating the lock cylinder from the ignition switch effectively. Remember to exercise caution and proceed with the drilling process carefully to avoid damaging other components of the ignition assembly or the steering column.
Begin Drilling

Once you have identified the shear line and gathered necessary tools, you can begin the drilling process to remove the ignition lock cylinder.
Prepare The Drilling Equipment
Ensure that you have a cordless drill with a small drill bit suitable for creating a pilot hole in the center of the ignition lock cylinder. It is recommended to start with a smaller drill bit size, such as 1/8 inch (3 mm), to create a pilot hole before moving on to larger drill bits.
Secure The Ignition Lock Assembly
It is important to stabilize the ignition lock assembly to prevent any unnecessary movement or damage during drilling. Use pliers or a vise grip to firmly hold the assembly in place. Be careful not to grip it too tightly, as it may cause deformation or harm to the ignition switch or wiring.
Begin With A Low Drill Speed
Set your cordless drill to a low-speed setting to initiate the drilling process. This will provide more control and minimize the danger of damaging the lock cylinder or other components. Start drilling at a slow and steady step to create the initial pilot hole.
Position The Drill Bit
Align the drill bit on the center of the ignition lock cylinder where you want to create the pilot hole. Apply slight pressure to keep the drill bit steady and prevent it from slipping. It is essential to maintain a consistent and perpendicular angle throughout the drilling process.
Create The Pilot Hole
Start drilling into the ignition lock cylinder using the small drill bit. Apply steady and controlled pressure, allowing the drill bit to penetrate the metal gradually. Be patient and avoid rushing the process. The goal is to create a small pilot hole in the center of the cylinder.
Increase The Drill Speed And Drill Bit Size
Once the pilot hole is established, you can increase the drill speed to a moderate level. Switch to a larger drill bit, such as 1/4 inch (6 mm), to enlarge the hole. Continue drilling while maintaining a controlled and steady pressure.
Monitor Progress And Adjust As Needed
As you drill, periodically check the depth and width of the hole to ensure you are progressing in the desired direction. Avoid drilling too deep, as it may damage other internal components. Adjust your drilling technique and speed as needed to maintain a controlled approach.
Stop Drilling When The Cylinder Separates
Keep drilling until the ignition lock cylinder separates from the ignition switch. You may notice a change in resistance or a distinct sound when the cylinder breaks free. At this point, the lock cylinder should be detached, allowing you to remove it from the ignition assembly.
Drilling through the ignition lock cylinder requires patience, precision, and careful control of the drill. Take breaks if needed, and avoid overheating the drill or damaging the steering column.
Increase The Drill Bit Size
Once the pilot hole is established, gradually increase the drill bit size. This process should be done incrementally, taking breaks to prevent overheating the drill bit or damaging the lock further. Remember to maintain steady pressure while drilling.
Assess The Pilot Hole
Examine the pilot hole you created using the small drill bit. Ensure that it is centered and that it provides a starting point for the larger drill bit. Please take note of its size and depth.
Select A Larger Drill Bit
Choose a drill bit that is marginally larger than the pilot hole. The exact size will depend on the desired final size of the hole and the requirements of your specific ignition lock cylinder. It is advisable to increase the drill bit size in small increments to prevent any sudden, excessive enlargement of the hole.
Prepare For Drilling
Before proceeding, ensure that you are wearing safety goggles and gloves for protection. Secure the ignition lock assembly with pliers or a vise grip to minimize movement during drilling.
Gradually Increase The Drill Bit Size
Insert the larger drill bit into the pilot hole, aligning it with the center of the ignition lock cylinder. Apply steady and controlled pressure as you drill, gradually increasing the size of the hole. It is important to maintain a consistent angle and avoid excessive lateral movement that may damage the surrounding components.
Take Breaks And Monitor Progress
As you drill with the larger bit, periodically pause to assess your progress. Check the depth and size of the hole to ensure that you are achieving the desired enlargement. If necessary, clean the hole and remove any debris that may accumulate during drilling. Take breaks to prevent overheating the drill bit, allowing it to cool down as needed.
Continue Incrementally
Repeat the process of increasing the drill bit size in small increments until you reach the desired final size. The number of size increases required will depend on the specific ignition lock cylinder and the removal method being employed. Be patient and maintain a steady pace to avoid damaging the lock cylinder or other internal components.
Monitor For Cylinder Separation
While drilling, stay attentive to any changes in resistance or distinct sounds that indicate the ignition lock cylinder is separating from the ignition switch. Adjust your drilling technique and speed accordingly to ensure a controlled and safe removal.
By gradually increasing the drill bit size, you can enlarge the hole in the ignition lock cylinder without causing excessive damage. Remember to take breaks, monitor your progress, and maintain steady pressure to remove the cylinder safely. If you encounter any unexpected challenges or difficulties during the process, consider seeking professional assistance or referring to a qualified locksmith.
Remove The Lock Cylinder
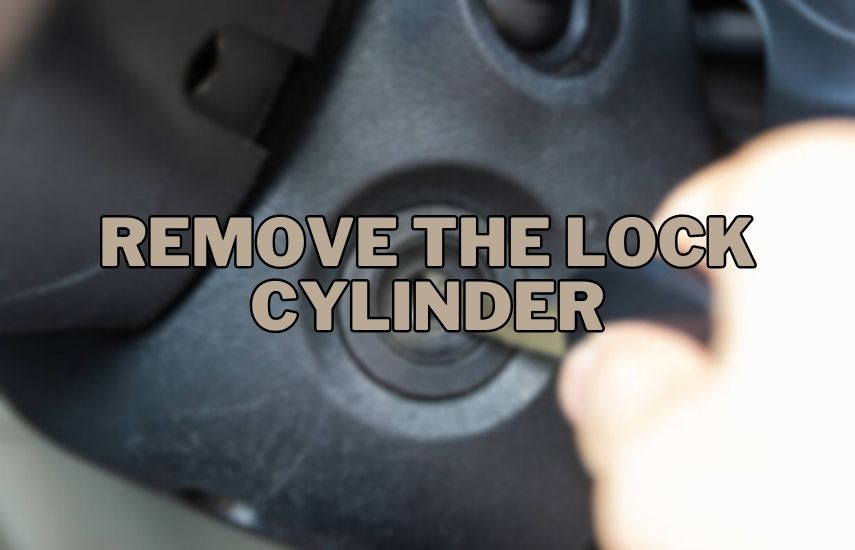
Once you have drilled through the lock cylinder and reached the point where it separates from the ignition switch, you can proceed with removing the cylinder from the ignition assembly. Here’s a more detailed explanation of how to safely remove the lock cylinder:
Assess The Drilling Progress
As you drill through the lock cylinder, periodically check your progress. Pay attention to any changes in resistance or the sound of the drill as you approach the separation point. Take note of the depth of the hole and ensure that you have successfully created enough space for the cylinder to be removed.
Use Pliers To Twist And Pull
Once you have drilled through the lock cylinder and reached the separation point, you can use pliers to remove it. Grip the outer housing of the cylinder firmly with the pliers, making sure you have a secure hold. Twist the pliers gently in a counterclockwise direction while applying steady, controlled pulling force. The cylinder should start to loosen and come out of the ignition switch.
Be Cautious And Patient
While removing the lock cylinder, it is important to be cautious and patient. Avoid excessive force or sudden movements that may damage the surrounding components or the ignition switch itself. If the cylinder does not come out easily, check for any remaining obstructions or pins that may be holding it in place. Adjust your approach as needed to ensure a smooth and successful removal.
Inspect The Ignition Assembly
Once the lock cylinder is removed, take a moment to inspect the ignition assembly. Look for any signs of damage or wear that may have contributed to the lock cylinder’s malfunction. If necessary, clean the area to remove any debris or metal shavings resulting from the drilling process.
Evaluate The Need For Replacement
Assess the condition of the lock cylinder and determine if it can be reinstalled or if a replacement is necessary. Factors such as wear, damage, or the reason for drilling out the lock may influence this decision. Consult with a qualified locksmith or refer to the manufacturer’s recommendations to determine the best course of action.
By using pliers to twist and pull the lock cylinder, you can safely remove it from the ignition assembly. Remember to exercise caution, be patient, and avoid any actions that could cause additional damage. If you encounter any difficulties during the removal process or if you are still determining the proper procedure, it is recommended to seek professional assistance from a qualified locksmith or automotive technician.
Replace Or Repair
After successfully removing the ignition lock cylinder, it is essential to assess its condition and determine whether it needs to be replaced or repaired.
Inspect The Lock Cylinder
Carefully examine the lock cylinder for any signs of wear, damage, or be defacted. Look for visible damage, such as broken or bent pins, worn keyways, or excessive corrosion. Assess the overall functionality of the cylinder, including its ability to rotate and engage with the ignition switch smoothly.
Consider The Reason For Removal
Evaluate the reason why the ignition lock cylinder was drilled out in the first place. If it was due to a lost key, damaged key, or a security issue, replace the cylinder to ensure the security and functionality of the ignition system. If the cylinder was removed for repair purposes, such as fixing a jammed or faulty mechanism, you can explore the possibility of repairing it instead.
Consult With A Professional Locksmith Or Automotive Technician
To make an informed decision regarding replacement or repair, it is recommended to consult with a professional locksmith or automotive technician. These experts have the knowledge and experience to assess the condition of the lock cylinder accurately and provide appropriate recommendations. They can determine if the cylinder can be repaired by replacing specific components or if it needs to be entirely replaced.
Consider The Cost And Availability
Take into account the cost and availability of replacement parts. Depending on the make, model, and age of your vehicle, obtaining a new lock cylinder may be more cost-effective or readily available compared to repairing the existing one. The professional you consult with can guide you on the best options based on your specific circumstances.
Make An Informed Decision
Based on the assessment, professional advice, and consideration of cost and availability, make an informed decision regarding whether to replace or repair the lock cylinder. Consider factors such as security, functionality, and long-term reliability.
Proceed With Replacement Or Repair
Once you have made a decision, follow the appropriate steps to either replace the lock cylinder with a new one or repair the existing cylinder as advised by the professional. If replacing, ensure you obtain the correct replacing part that matches the specifications of your vehicle. If repairing, work with the professional to address the specific issues and replace any necessary components.
By assessing the condition of the lock cylinder, consulting with professionals, and considering factors such as cost and availability. This will help ensure the security and functionality of your vehicle’s ignition system.
Reassemble And Test
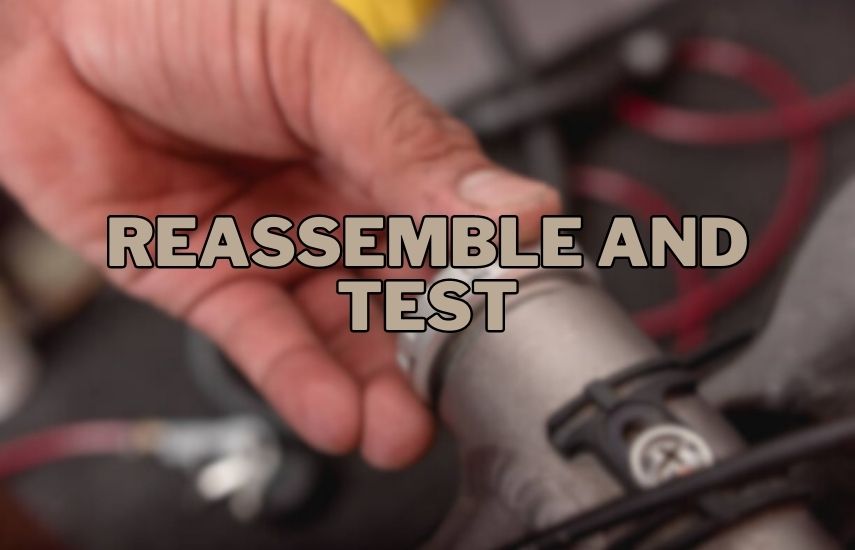
Once the ignition lock has been repaired or replaced, reassemble the components in the reverse order of disassembly. Reconnect the battery and test the ignition to ensure proper functioning.
Gather The Reassembly Tools
Collect all the necessary tools and components required for reassembly. These may include screwdrivers, pliers, the new or repaired ignition lock cylinder, and any other parts that were removed during the disassembly process.
Reconnect The Electrical Connections
Begin by reconnecting any electrical connections that were detached during the disassembly. This may include reconnecting the wiring harnesses, ignition switch, or any other electrical components that were disconnected.
Reinstall The Ignition Lock Cylinder
Carefully insert the repaired or replacement ignition lock cylinder back into the ignition assembly. Ensure that it is aligned correctly and fully seated. If there are any retaining clips or screws, secure them in place as necessary.
Replace The Steering Column Cover
Retrieve the steering column cover that was set aside earlier. Align it properly with the steering column and gently snap it back into place. If some screws or bolts were removed, use a screwdriver to reattach them securely.
Reconnect The Vehicle’s Battery
Before testing the ignition, reconnect the vehicle’s battery by carefully reattaching the negative terminal connection. Ensure that it is tightened securely.
Test The Ignition System
With the battery reconnected, test the ignition system to ensure proper functioning. Put the key into the ignition lock cylinder and turn it to the appropriate position (usually the “On” or “Start” position). Verify that the dashboard lights illuminate and the engine cranks or starts smoothly.
Check For Any Issues
While testing the ignition, pay attention to any unusual sounds, vibrations, or malfunctions. Verify that the key can be inserted and removed smoothly and that the ignition functions as expected. If there are any issues or abnormalities, consult with a professional to diagnose and resolve them.
Finalize The Reassembly
Once you have confirmed that the ignition system is working correctly, finalize the reassembly by securing any remaining components or covers. Ensure that all screws or bolts are tightened appropriately and that the steering column cover is securely in place.
By reassembling the components in the reverse order of disassembly and testing the ignition system, you can ensure that the repaired or replaced ignition lock cylinder is functioning properly. If you encounter any difficulties during the reassembly process or if the ignition system does not work as expected, it is advisable to seek assistance from a qualified automotive technician or locksmith.
Conclusion (How To Drill Out Ignition Lock)
Drilling out an ignition lock is a task that should be taken with seriousness and requires careful consideration. It is essential to approach this procedure with caution and only attempt it if you have experience or are under the guidance of a professional. While this guide provides information on the process, it is crucial to understand that it is for informational purposes only.
It is strongly recommended to seek expert assistance when dealing with ignition locks. Professionals, such as locksmiths or automotive technicians, have the necessary expertise, tools, and knowledge to handle this task safely and effectively. They can ensure that the procedure is carried out correctly, minimizing the risk of further damage or compromising the security of your vehicle.
If you are still determining any aspect of the process or need more experience, it is best to consult a professional. They can assess the situation, provide appropriate guidance, and handle the task efficiently.
Remember, your safety and the proper functioning of your vehicle are of utmost importance. Drilling out an ignition lock is a task that requires expertise, and seeking professional assistance is strongly advised.


